Introduction
Vibration test fixtures are the mechanical interface between the shaker system and the unit under test (UUT). Their purpose appears simple: hold the test item securely and transmit the specified vibration input. In practice, fixture design is one of the most important and often underestimated parts of a successful vibration test.
A well-designed fixture should be:
- Lightweight
- Stiff
- Dynamically well behaved
- Easy to install and inspect
- Representative of the actual service mounting condition
- Compatible with the shaker, head expander, slip plate, and control strategy
The best fixtures are usually simple. They use the minimum amount of material needed to support the UUT and provide the required attachment points. They avoid unnecessary brackets, thick plates, long standoffs, and decorative machining features. Every added pound of fixture mass must be accelerated by the shaker, and every flexible feature has the potential to introduce a resonance into the test band.
This is not merely a matter of convenience. Shakers and power amplifiers are limited by force, current, voltage, displacement, velocity, and thermal capacity. Newton’s second law gives the basic constraint:
F = ma
For a fixed shaker force rating, the available acceleration decreases as the combined moving mass increases. The moving mass includes the shaker armature, head expander, slip plate, fixture, fasteners, cables, and UUT. A heavy fixture consumes shaker capacity that would otherwise be available to excite the test item.
A fixture that uses half of the shaker’s available force capacity before the UUT is even installed is usually a poor fixture, even if it is beautifully machined.
The fixture must also transmit the specified input spectrum to the UUT attachment points without excessive amplitude or phase distortion. The ideal fixture behaves as a rigid body over the entire test frequency range. In reality, every fixture has resonances. The design objective is to place these resonances above the test band, or to damp them sufficiently so that their transmissibility remains close to unity.
A fixture should not become the dominant dynamic system in the test. The test is intended to qualify or evaluate the UUT, not the fixture.
Basic Fixture Design Objectives
A practical vibration fixture should satisfy several competing requirements.
First, it must have sufficient static strength to support the UUT under gravity, handling loads, and vibration loads. This includes bolt preload, shear transfer, overturning moments, and any eccentric loading due to the UUT center of gravity.
Second, it must have adequate dynamic stiffness. Static stiffness alone is not enough. A fixture may appear rigid under hand loading but still exhibit a bending, torsional, or rocking mode within the vibration test band.
Third, it must be light enough that the shaker can achieve the required test level. This is especially important for high-frequency random vibration testing, where shaker back-EMF, armature dynamics, amplifier limits, and fixture mass all influence performance.
Fourth, it must preserve the intended boundary condition. The UUT should be mounted in a way that resembles its flight, vehicle, shipboard, rack, cabinet, or machinery installation as closely as practical. A test fixture that clamps the UUT in a different way from the service installation can produce misleading results.
Finally, the fixture must be practical. It must allow access for installation, torque verification, cable routing, instrumentation, inspection, and removal. A fixture that is theoretically excellent but difficult to install correctly can lead to poor test repeatability.
Fixture Mass and Shaker Performance
Fixture mass directly affects shaker capability. The shaker force rating is not available solely for the UUT. The force must accelerate the entire moving system.
A simplified estimate is:
a = F / m
where:
- (F) is the available shaker force
- (m) is the total moving mass
- (a) is the achievable acceleration
For example, if the fixture, head expander, and UUT together weigh twice as much as expected, the available acceleration is approximately cut in half, assuming the shaker is force-limited. In practice, the situation may be worse because the shaker may also encounter displacement, velocity, current, or voltage limits.
This is particularly important for:
- High-level random vibration tests
- High-frequency tests extending to 1000 Hz or 2000 Hz
- Large head expanders
- Horizontal tests using slip plates
- UUTs with high centers of gravity
- Multi-item fixtures that carry several test articles at once
The fixture designer should therefore work with the test laboratory early in the design process. The laboratory can provide shaker force rating, armature mass, head expander mass, slip plate mass, usable frequency range, overturning moment limits, and payload limits.
The fixture should not be designed in isolation and then delivered to the lab as an afterthought.
Materials
Aluminum Alloys
Aluminum alloy is the standard material for many small and medium vibration fixtures. It offers a favorable combination of low density, good machinability, adequate strength, and reasonable cost.
Two alloys are especially common.
6061-T6 Aluminum
6061-T6 is the general-purpose workhorse alloy for vibration fixtures. It machines well, is widely available, and is suitable for many plate, bracket, and adapter designs. It has adequate strength for many applications and is relatively forgiving from a fabrication standpoint.
Typical advantages include:
- Good machinability
- Good availability
- Moderate cost
- Good corrosion resistance
- Weldability, if required
- Adequate strength for many fixture applications
The main disadvantages are modest strength compared with higher-strength aluminum alloys and low material damping.
7075-T6 Aluminum
7075-T6 is often selected when higher strength is needed or when the fixture must be made thinner and lighter than would be practical with 6061-T6. It has much higher yield strength than 6061-T6 and is useful for highly loaded adapters, thin sections, or fixtures where weight is a primary constraint.
Typical advantages include:
- High strength
- Good stiffness-to-weight performance
- Good machinability
- Ability to reduce section thickness in some designs
Disadvantages include:
- Higher cost
- Lower corrosion resistance than 6061 unless properly protected
- Poorer weldability
- Greater sensitivity to stress concentrations and fatigue details
The important point is that 7075-T6 is stronger than 6061-T6, but it is not significantly stiffer. The elastic modulus of aluminum alloys is broadly similar. If the fixture problem is stiffness-controlled rather than strength-controlled, simply switching from 6061-T6 to 7075-T6 may not solve the problem. Geometry is usually the dominant factor for stiffness.
Magnesium Alloys
Magnesium alloys are attractive for vibration fixtures and head expanders because of their low density and relatively high damping compared with aluminum. Magnesium can provide a useful combination of low mass, good stiffness-to-weight ratio, and improved resonance control.
Magnesium is especially useful when a fixture resonance cannot easily be moved above the test band by geometry alone.
Magnesium Zirconium K1A
Magnesium zirconium K1A, often used in cast form, has historically been valued for vibration fixtures and head expanders because of its damping characteristics. Cast magnesium structures can be designed with ribs, pockets, and complex shapes that would be expensive to machine from billet.
The zirconium addition refines the grain structure and can improve mechanical properties relative to some conventional magnesium casting alloys. K1A-type cast magnesium fixtures are especially useful for complex geometries where damping and weight are both important.
AZ31B Magnesium Tool Plate
AZ31B magnesium tool plate is a wrought magnesium alloy available in plate form. It can sometimes be used as a direct substitute for aluminum plate in conventional machined fixture designs.
Advantages include:
- Low density
- Better damping than aluminum
- Good machinability
- Availability in plate form
- Potential weight savings
Disadvantages include:
- Higher material and handling cost
- Fire risk from fine chips during machining
- Need for proper machining procedures and coolant control
- Galvanic corrosion risk when attached to steel or other dissimilar metals
- Need for protective coatings in some environments
Magnesium should be used with appropriate shop controls. Fine magnesium chips and dust can be hazardous. The machine shop must be familiar with magnesium machining, chip handling, fire prevention, and coolant requirements.
Damping Considerations
Fixture damping is often overlooked because stiffness receives most of the attention. However, damping can be just as important when a fixture mode falls within or near the test band.
A lightly damped resonance can produce large transmissibility peaks. In some cases, the local acceleration at a fixture or UUT attachment point may be several times higher than the control acceleration. This can result in over-testing at one frequency and under-testing at another.
A simplified single-degree-of-freedom transmissibility curve illustrates the problem. Near resonance, the response depends strongly on damping. Low damping produces a tall, narrow peak. Higher damping produces a lower, broader peak. The test objective is usually not to amplify the input but to reproduce the specified base motion at the UUT interface.
Practical damping sources include:
- Material damping
- Bolted joint friction
- Interface friction
- Constrained layer damping
- Damped head expanders
- Damped magnesium structures
- Properly torqued joints with clean mating surfaces
However, damping should not be used as an excuse for poor stiffness. The first design goal is still to keep significant fixture resonances out of the test band whenever practical.
Geometry and Stiffness
Fixture stiffness is strongly controlled by geometry. Increasing material thickness helps, but it also adds mass. Better designs usually increase stiffness through efficient geometry rather than simply adding more material.
Useful design features include:
- Ribs
- Box sections
- Triangulated supports
- Short load paths
- Large moment-of-inertia sections
- Low-profile UUT mounting
- Symmetric layouts
- Direct load transfer into the shaker interface
Poor design features include:
- Tall slender posts
- Long cantilevered brackets
- Thin unsupported plates
- Eccentric UUT mounting
- Unnecessary spacers
- Large flat plates without ribbing
- Off-center mass distribution
- Flexible adapter stacks
A ribbed plate is usually superior to a thick solid plate of the same mass. The ribbed plate places material farther from the neutral axis, increasing bending stiffness more efficiently.
The designer should ask: where does the load flow?
The load path should be short, direct, and symmetric. If the vibration force must travel through a long chain of adapters, spacers, bolted joints, and cantilevered brackets, the fixture will likely have unwanted modes.
Bolted Joints
Many fixtures are assembled using bolted joints. Bolted construction allows modularity, easier machining, and reconfiguration for different UUTs. Bolted joints also introduce frictional damping, which can be beneficial.
However, bolted joints must be treated as structural elements, not merely as convenient assembly features.
Important considerations include:
- Bolt size and grade
- Thread engagement
- Preload
- Torque procedure
- Surface finish
- Flatness
- Joint slip
- Fastener locking method
- Reuse and inspection
Bolted interfaces should be flat, clean, and free from burrs. Paint, thick coatings, debris, or uneven anodize buildup can reduce joint stiffness and cause preload relaxation.
Critical bolts should be torqued using a controlled procedure. For important fixtures, the torque values should be included on the fixture drawing or test setup sheet. Witness marks may be useful to detect loosening during the test.
Bolted joints can provide useful damping through microslip, but excessive slip is a problem. If the joint slips significantly during test, the fixture may become nonlinear. This can cause shifting resonant frequencies, rattling, loss of repeatability, and bolt loosening.
For high-level tests, bolted joints should be designed so that friction carries the shear load under preload rather than allowing the bolts to bear directly against the holes.
Welded Joints
Welded fixtures can provide excellent rigidity when properly designed and fabricated. Welding may be appropriate for box structures, frames, ribbed weldments, and large fixtures where machining from a solid billet would be impractical or expensive.
However, welding introduces important risks.
Residual Stress and Distortion
Welding produces localized heating and cooling. The weld zone expands during heating and contracts during cooling. Because the surrounding material restrains this movement, residual stresses and distortion are introduced.
Common problems include:
- Warped mounting surfaces
- Angular distortion
- Misaligned bolt patterns
- Residual tensile stress near welds
- Dimensional instability after machining
For this reason, welded fixtures should generally be stress relieved before final machining. Rough machining may be performed first, followed by welding, stress relief, and final machining of critical surfaces.
The exact stress-relief procedure depends on the material, temper, weld process, and dimensional requirements. Care must be taken not to degrade the mechanical properties of heat-treated aluminum or magnesium alloys.
Weld Defects
Welds can contain defects such as:
- Porosity
- Inclusions
- Lack of fusion
- Undercut
- Cracks
- Incomplete penetration
- Poor weld profile
These defects are serious because vibration fixtures experience cyclic loading. A small defect can become a fatigue crack initiation site.
Critical welds should be inspected. Depending on the application, inspection may include:
- Visual inspection
- Dye penetrant inspection
- Radiographic inspection
- Ultrasonic inspection
- Proof testing
- Periodic reinspection after repeated use
The required inspection level should be based on risk. A one-time low-level laboratory fixture may not need the same inspection rigor as a reusable aerospace qualification fixture.
Weld Quality and Detail Design
Weld details should avoid abrupt transitions. Smooth weld toes and gradual load transfer are preferred. Stop-start locations should be kept away from highly stressed regions when practical.
Multiple smaller weld passes are often preferable to one heavy pass. Multiple passes allow cleaning and inspection between passes and can reduce the likelihood of large defects.
The designer should avoid placing welds directly at peak stress locations when possible. It is usually better to move the weld away from the highest bending stress region and allow the base material to carry the primary load.
Head Expanders
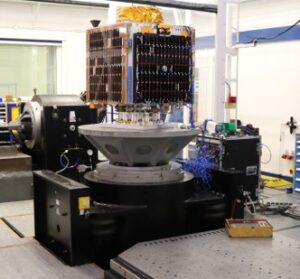
The shaker drive table is typically smaller than many test items. A head expander is used when the UUT or fixture footprint exceeds the shaker armature mounting pattern.
A head expander bolts to the shaker armature and provides a larger mounting surface. It may be a solid plate, ribbed plate, welded structure, or cast structure. For high-performance systems, magnesium head expanders are common because they provide good stiffness and damping with lower mass than steel and often better damping than aluminum.
The head expander is not passive from a dynamic standpoint. It becomes part of the moving system. Its mass, stiffness, damping, and modes all affect the test.
Important head expander considerations include:
- Mass
- Bending stiffness
- Torsional stiffness
- Bolt pattern
- Interface flatness
- Resonant frequency
- Damping
- Rocking modes
- Overturning moment limits
- Control accelerometer placement
A heavy head expander can consume a large portion of the shaker’s payload capability. This is especially significant for high-acceleration random testing.
The head expander should be stiff enough that its first significant bending mode is above the test frequency range. If this is not practical, the mode should be identified and managed through control strategy, damping, or test limitations.
A ribbed or honeycomb-style head expander is usually better than a solid slab because it increases bending stiffness efficiently.
Rocking Modes with Head Expanders
Rocking modes are a common problem in head expander testing. A rocking mode is a rotational resonance of the combined shaker, head expander, fixture, and UUT assembly.
The problem is often caused by height. The UUT center of gravity is above the shaker thrust axis. When the shaker applies vertical force, any offset or flexibility can produce a pitching or rolling motion. At the rocking mode frequency, the UUT may experience significant angular motion in addition to the intended translational acceleration.
Rocking modes can cause:
- Off-axis acceleration
- Phase differences between mounting points
- Large response at one side of the UUT
- Control instability
- Excessive overturning moment
- Misleading test results
- Local over-test or under-test
Mitigation methods include:
- Keeping the fixture low
- Keeping the UUT center of gravity close to the shaker axis
- Using a symmetric fixture
- Reducing unnecessary head expander height
- Avoiding tall adapter stacks
- Using multiple control accelerometers
- Performing a low-level survey before full-level testing
- Checking overturning moment limits with the laboratory
Multiple control accelerometers can help, but they do not eliminate the rocking mode. They only improve the controller’s estimate of the average interface motion.
Slip Plates

Horizontal vibration testing is commonly performed using a slip plate, also called a horizontal slip table.
An electrodynamic shaker produces motion along its drive axis. For horizontal testing, the shaker is mechanically coupled to a plate that slides on a low-friction bearing surface. The UUT and fixture are mounted to this plate. The shaker remains aligned with its armature axis while the slip plate provides horizontal motion.
Slip plates are necessary for many test items because rotating the shaker or UUT may not be practical.
Air-Bearing Slip Plates
Air-bearing slip plates use a thin film of pressurized air between the moving plate and a precision bearing surface, often granite or cast iron.
Advantages include:
- Very low friction
- Excellent flatness
- Good high-frequency performance
- Low wear
- Clean translational motion
Disadvantages include:
- Need for clean, dry compressed air
- Sensitivity to contamination
- More demanding maintenance
- Potential loss of performance if the air film is disturbed
Air-bearing systems are often preferred for high-frequency and precision vibration testing.
Oil-Film Slip Plates
Oil-film slip plates use a thin layer of oil between the moving plate and the bearing surface.
Advantages include:
- Robustness
- Good load capacity
- Better tolerance of some contamination
- Often lower cost than air-bearing systems
Disadvantages include:
- More viscous drag
- Potential temperature effects
- Maintenance and cleanliness requirements
- Possible influence on high-frequency response
Oil-film slip plates are common for larger payloads and many industrial test applications.
Slip Plate Drive Coupling
A slip plate must be driven through a stiff coupling. This coupling is typically a drive bar, driver, or trunnion block that connects the shaker armature to the slip plate.
This should not be confused with a modal test stinger.
In modal testing, a stinger is intentionally slender and laterally flexible so that the exciter does not constrain the structure. In base excitation testing, the objective is different. The shaker must drive the slip plate as a base input. The coupling must transmit large dynamic forces with minimal axial compliance.
If the drive coupling is too flexible, force transmission is degraded, especially at higher frequencies. The coupling itself may introduce resonances, phase lag, and control difficulties.
The slip plate bearing system, not a flexible stinger, provides the needed isolation from off-axis forces and moments.
Slip Plate Mass and Resonance
A slip plate can weigh several hundred pounds on a large shaker system. This mass directly reduces the acceleration capability of the system. The mass of the slip plate, fixture, and UUT must be included in the shaker performance calculation.
Slip plates also have their own bending and torsional resonances. A large plate may not move as a rigid body at high frequency. Different points on the plate can have different acceleration amplitudes and phases.
This is a serious issue when the UUT has a large footprint. A single control accelerometer may not represent the motion at all attachment points. In such cases, multiple accelerometers should be placed near the UUT mounting interface.
A low-level survey can reveal whether the slip plate and fixture are moving as a rigid body over the required test band.
Rocking Modes with Slip Plates
Slip plate setups are also susceptible to rocking modes.
In horizontal testing, the shaker applies force near the slip plate plane, while the UUT center of gravity is above the plate. This creates a moment arm. The higher the center of gravity, the greater the pitching moment.
The rocking mode frequency depends on:
- UUT mass
- Fixture mass
- Center-of-gravity height
- Slip plate stiffness
- Bearing stiffness
- Drive coupling stiffness
- Rotational inertia of the assembly
Rocking can cause vertical acceleration, pitch motion, and uneven acceleration across the UUT interface. A test intended to be single-axis horizontal excitation may therefore contain significant off-axis content.
Mitigation methods include:
- Keeping the fixture low
- Mounting the UUT as close to the plate as possible
- Aligning the UUT center of gravity with the drive axis when practical
- Avoiding tall standoffs
- Using a sufficiently stiff slip plate
- Using multiple control accelerometers
- Performing low-level surveys
- Considering dual-shaker drive for special cases
Dual-shaker slip plate systems can reduce pitch excitation by driving the plate at two points, but they add complexity and cost.
Sequential, Biaxial, and Triaxial Testing
Most vibration qualification tests are performed sequentially in three orthogonal axes. The UUT is tested in one axis, then reoriented or remounted for the next axis.
Sequential single-axis testing is practical, widely specified, and compatible with most electrodynamic shaker systems. However, it does not fully reproduce the simultaneous multi-axis loading that many structures experience in service.
Biaxial and triaxial systems can apply vibration in more than one direction at the same time. These systems may be useful for special applications where axis coupling is important, but they are more complex and less common.
The fixture design must match the test philosophy. A fixture that is adequate for one-axis-at-a-time testing may not be suitable for simultaneous multi-axis testing because the load paths and moments are different.
Control Accelerometer Placement
Control accelerometer placement is one of the most important practical decisions in a vibration test.
The control accelerometer should measure the input that the UUT actually receives. Therefore, control accelerometers should usually be placed near the UUT attachment points, not on a remote fixture surface.
Poor control placement can cause serious errors.
If the control accelerometer is placed at a local resonance, the controller may reduce the drive at that frequency, causing the UUT to be under-tested. If the control accelerometer is placed at a local antiresonance, the controller may increase the drive, causing over-test elsewhere.
For small rigid fixtures, one control accelerometer may be adequate. For larger fixtures, head expanders, slip plates, or UUTs with multiple mounting points, multiple control accelerometers are often preferred.
Common control strategies include:
- Single-point control
- Averaged control
- Extremal control
- Notched control
- Force-limited control
- Multi-point control
Averaged control can be useful when the goal is to represent the average motion at several attachment points. Extremal control may be used to avoid exceeding limits at any one location. Force limiting may be appropriate when the test item and fixture interaction could produce unrealistic interface forces.
The control strategy should be selected before the fixture is finalized, not after problems appear during the test.
Fixture Survey Testing
Every new fixture should be characterized before full-level testing. This is commonly done with a low-level sine sweep, random survey, or modal check.
The objectives are to identify:
- Fixture resonant frequencies
- Head expander modes
- Slip plate modes
- Rocking modes
- Local bracket modes
- Transmissibility between control and response points
- Phase differences across the UUT interface
- Unexpected rattles or loose joints
The survey should be performed at low level to avoid damaging the UUT or fixture. In some cases, the survey is performed with a mass simulator instead of the actual UUT.
A good fixture survey includes accelerometers at the intended control points and at several response locations on the fixture and UUT interface. The transmissibility from control to response locations should be reviewed before proceeding to full level.
If the survey reveals a significant fixture mode inside the test band, the best solution is usually to modify the fixture. Control-system workarounds should be used carefully because they may hide the problem rather than solve it.
Use of Mass Simulators
A mass simulator may be used when the actual UUT is unavailable, expensive, fragile, classified, or not ready for full-level testing. The simulator should represent the UUT mass, center of gravity, and mounting interface as closely as practical.
A simple steel block with the same weight may not be adequate if its stiffness and center of gravity are very different from the real UUT.
Important simulator properties include:
- Total mass
- Center-of-gravity location
- Moments of inertia
- Mounting bolt pattern
- Interface stiffness
- Approximate stiffness distribution
- Cable or harness mass, if significant
The mass simulator is especially useful for checking shaker performance, fixture modes, bolt loads, and rocking behavior before exposing the actual test item.
Attachment Interface and Boundary Conditions
The fixture-to-UUT interface should reproduce the service boundary condition as closely as possible.
This includes:
- Bolt size
- Bolt grade
- Bolt torque
- Number of fasteners
- Mounting surface flatness
- Use of washers
- Use of inserts
- Interface material
- Mounting orientation
- Support stiffness
- Local contact area
A UUT mounted to a massive laboratory fixture may respond differently than the same UUT mounted to a lightweight aircraft panel, vehicle bracket, electronics rack, or machinery frame. Sometimes this difference is acceptable because the test is intended as a conservative qualification. In other cases, it may be misleading.
The boundary condition should be documented in the test plan and fixture drawing. If the fixture intentionally differs from the service installation, the reason should be stated.
Cable and Hose Routing
Cable and hose routing can influence vibration test results. A stiff cable bundle can add unintended restraint. A loose cable can slap against the fixture or UUT and create spurious response.
Routing should provide enough slack for shaker motion while avoiding contact, rubbing, and whipping. Cables should be supported so that they do not carry significant load into the UUT unless that represents the service condition.
Good practice includes:
- Providing strain relief
- Avoiding tight bends
- Preventing cable slap
- Keeping cables clear of moving interfaces
- Avoiding heavy unsupported harnesses
- Documenting cable configuration
- Repeating the same routing for repeat tests
For high-frequency tests, even small cables can influence local response if they are stiff relative to the component being tested.
Fasteners and Inserts
Fasteners used in vibration fixtures should be selected and installed carefully. Loose fasteners are a common cause of failed or invalid tests.
Recommended practices include:
- Use high-strength fasteners for critical joints
- Verify thread engagement
- Use hardened washers where appropriate
- Torque bolts in a controlled sequence
- Mark critical bolts after torque
- Recheck torque after low-level survey when appropriate
- Avoid bottoming bolts in blind holes
- Avoid thread galling
- Use locking features where required
Threaded inserts may be useful for aluminum or magnesium fixtures that will be assembled repeatedly. Inserts can reduce thread wear and improve durability.
However, inserts must be installed correctly and inspected. A loose insert can be worse than a worn thread.
Surface Finish, Flatness, and Alignment
Fixture interface surfaces should be flat and properly aligned. Poor flatness can lead to uneven preload, local bending, joint slip, and reduced interface stiffness.
Important surfaces include:
- Shaker table interface
- Head expander interface
- Slip plate interface
- Fixture-to-UUT mounting pads
- Adapter plate interfaces
- Load cell interfaces, if force limiting is used
Critical surfaces should be machined after welding and stress relief when possible. Burrs should be removed. Paint or coating buildup should not be allowed to interfere with structural interfaces.
Alignment is also important. If the UUT center of gravity is offset from the shaker axis, overturning moments increase. Some offset may be unavoidable, but it should be recognized and included in the test setup review.
Force Limiting Considerations
For some tests, especially aerospace vibration qualification tests, force limiting may be used to prevent unrealistic interface forces. This is particularly relevant when the test item is mounted to a very stiff laboratory fixture that does not represent the compliance of the actual flight or service structure.
Force limiting requires load cells or force transducers at the interface. The fixture must therefore be designed to accommodate these transducers without introducing unwanted compliance or eccentricity.
Important considerations include:
- Load cell mounting pattern
- Load path through the transducers
- Calibration
- Preload
- Cross-axis sensitivity
- Moment loading
- Cable routing
- Control-system compatibility
- Notching logic
Force limiting does not remove the need for a good fixture. A poor fixture can still cause local dynamics, rocking modes, or unrealistic boundary conditions. Force limiting is a control method, not a substitute for sound mechanical design.
Finite Element Analysis of Fixtures
Finite element analysis can be useful for fixture design, especially for large, complex, or high-value tests. FEA can estimate static stress, deflection, modal frequencies, and mode shapes before fabrication.
Useful analyses include:
- Static stress under equivalent acceleration loads
- Bolt load and interface load checks
- Modal analysis of the fixture alone
- Modal analysis of the fixture with UUT or mass simulator
- Harmonic response analysis
- Random response analysis
- Sensitivity studies for rib thickness and support location
The finite element model should include realistic boundary conditions. A fixture bolted to a head expander is not the same as a fixture fixed to an infinitely rigid wall. Bolt interfaces, contact surfaces, and shaker mounting flexibility can affect the results.
FEA should be used to guide design, but test verification is still necessary. The actual fixture may differ from the model because of joint flexibility, machining tolerances, material damping, weld distortion, and assembly details.
Practical Resonance Guidelines
The ideal fixture has its first significant resonance well above the upper frequency of the test. A common rule of thumb is that the first fixture resonance should be at least 1.5 times the upper test frequency.
For example:
- For a test to 500 Hz, target the first significant fixture mode above 750 Hz.
- For a test to 1000 Hz, target the first significant fixture mode above 1500 Hz.
- For a test to 2000 Hz, this becomes much more difficult, especially for large fixtures.
This rule is only a guideline. The acceptability of a fixture mode depends on mode shape, damping, transmissibility, control strategy, UUT sensitivity, and test objectives.
A small local mode far from the UUT interface may be acceptable. A global rocking mode involving the entire UUT is much more serious.
Common Fixture Problems
Common problems observed during shaker testing include:
- Fixture resonance inside the test band
- Head expander bending mode
- Slip plate bending mode
- Rocking mode due to high UUT center of gravity
- Loose bolts
- Joint slip
- Cable slap
- Inadequate control accelerometer placement
- Excessive fixture mass
- Overturning moment beyond shaker limits
- Fixture yielding at bolt holes
- Cracking near welds
- Misalignment between fixture and shaker axis
- Poorly documented setup
- Non-representative boundary condition
Many of these problems can be prevented by early coordination between the design engineer, test engineer, analyst, machinist, and test laboratory.
Fixture Design Checklist
Before releasing a vibration test fixture for fabrication, the following questions should be answered.
Shaker Compatibility
- What shaker will be used?
- What is the shaker force rating?
- What are the displacement, velocity, current, and voltage limits?
- What is the allowable payload?
- What is the allowable overturning moment?
- Will a head expander or slip plate be used?
- What is the mass of the head expander or slip plate?
- Is the fixture mass acceptable?
UUT Interface
- Does the fixture reproduce the service mounting condition?
- Are the bolt pattern and torque values correct?
- Are inserts required?
- Is the UUT center of gravity known?
- Is the CG close to the shaker drive axis?
- Are cables and hoses represented correctly?
Structural Design
- Are the load paths short and direct?
- Are cantilevers minimized?
- Is ribbing used efficiently?
- Are tall standoffs avoided?
- Are bolted joints properly designed?
- Are welded joints inspected and stress relieved as required?
- Are stress concentrations minimized?
Dynamic Design
- Has a modal analysis been performed?
- Is the first significant fixture resonance above the test band?
- Are rocking modes expected?
- Are local bracket modes present?
- Is damping adequate?
- Are multiple control accelerometers needed?
- Is force limiting required?
Fabrication and Inspection
- Are critical surfaces machined flat?
- Are burrs removed?
- Are coatings controlled at interfaces?
- Are welds inspected?
- Are torque values documented?
- Are fasteners marked after torque?
- Is there a plan for periodic inspection if the fixture will be reused?
Test Readiness
- Will a low-level survey be performed?
- Will a mass simulator be used?
- Are accelerometer locations defined?
- Is the control strategy documented?
- Are abort limits defined?
- Is the test setup photographed and documented?
Conclusion
A vibration fixture is not just a mechanical adapter. It is part of the dynamic test system. Its mass, stiffness, damping, joints, geometry, and boundary conditions all influence the vibration input delivered to the UUT.
The best fixture is usually the simplest fixture that satisfies the structural and dynamic requirements. It should be light enough to preserve shaker capability, stiff enough to avoid significant resonances in the test band, damped enough to control unavoidable modes, and representative enough to provide meaningful test results.
Head expanders and slip plates add further complexity. They increase moving mass, introduce bending and rocking modes, and require careful control accelerometer placement. Horizontal testing on a slip plate is especially sensitive to UUT center-of-gravity height and drive-axis alignment.
Good fixture design requires coordination between analysis, design, fabrication, and test. A low-level survey should be performed before full-level testing, and any significant fixture dynamics should be understood before the UUT is exposed to qualification levels.
A poor fixture can invalidate an otherwise well-planned vibration test. A good fixture makes the shaker, controller, instrumentation, and UUT work together as intended.
References
Welded Joint Concerns for Shock, Vibration & Fatigue
Bruel & Kjaer Fixture Guidelines
See also: Material Damping
– Tom Irvine
great info Mahboob. we do environmental chamber integration to vibration shaker. regards,
wilson 9880005799 http://www.kelviron.in